You are viewing 1 of your 1 free articles
Defending crosses
This session is all about defending against crosses in and around the penalty area. It allows us to work with the players on their defensive positioning, as well as encouraging them to squeeze the pitch and to play out on the transition of possession. As the modern game is becoming more about creativity around the penalty area, defensively we need to counter this with good positional sense, effective communication and players prepared to sacrifice for their team.

| Area | Up to two thirds of a pitch |
| Equipment | Balls, bibs, cones, 2 small goals, 1 full size goal |
| No. of Players | Up to 16 outfield players + 1 goalkeeper |
| Session Time |
Practice 1: 15mins Practice 2: 15mins Game: 20mins |
This session is all about defending against crosses in and around the penalty area. It allows us to work with the players on their defensive positioning, as well as encouraging them to squeeze the pitch and to play out on the transition of possession.
As the modern game is becoming more about creativity around the penalty area, defensively we need to counter this with good positional sense, effective communication and players prepared to sacrifice for their team.
We would run this session at least once a week, especially when we are due to be playing against a team that employs dangerous wide players and full backs that push high up the pitch. Being competent at defending is extremely important when coming up against teams of high calibre with good creative players.
What do I get the players to do?
Practice 1
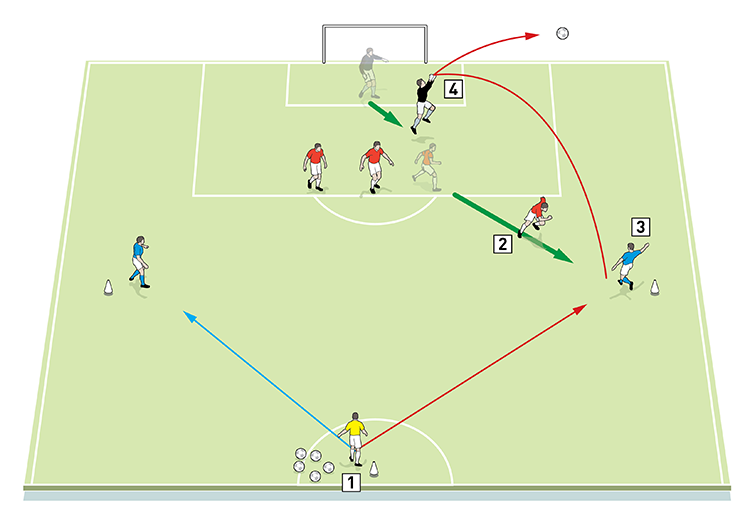
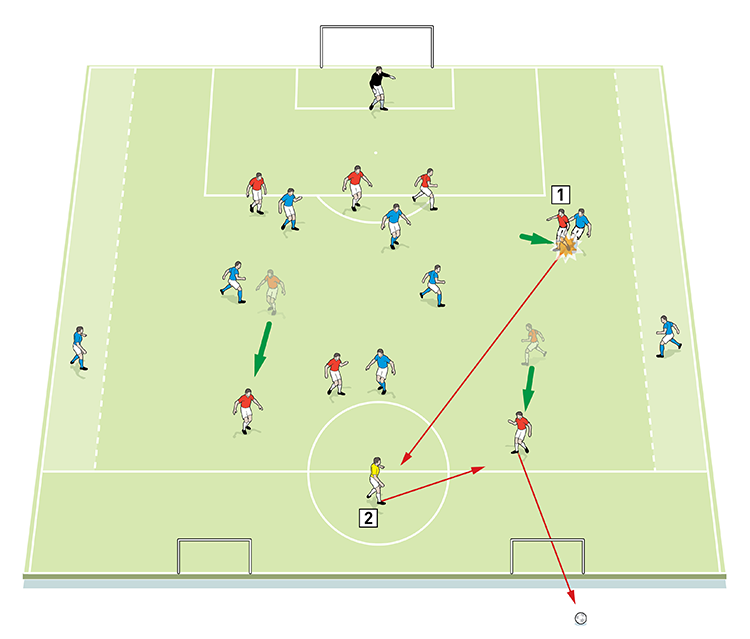
We set up on half a pitch with a goal and goalkeeper in their normal position, as shown [1]. We’re using six outfield players: a yellow server who makes the first pass from the edge of the centre circle; three red defenders who start in the penalty area lined up no wider than the width of the goal; and two blue wide attackers.
1
2. The nearest full back moves to cover the player receiving the ball but he does not dive in
3. The wide attacker crosses the ball into the penalty area
4. The goalkeeper must command his area with a catch or a punch
The server plays the starting ball to either of the wide attackers. The nearest red full back moves to cover the receiving player and tries to prevent the cross at its source, but he shouldn’t dive in. The wide attacker should try to cross into the penalty area and the goalkeeper must command his penalty area, defending against the cross with a catch or a punch.
How do I progress the session?
Practice 2
Using the same basic set-up, we add four players to the attacking blue team and one extra defender to the red team, meaning the reds are defending with a back four. Two of the blues are attacking full backs and they are restricted to a coned-off wide channel, with one on each side of the pitch. They are allowed two touches.
The server makes the same starting pass to the wide attacker, but now the blues have additional forwards to support any attacking move. The nearest red full back to the ball should still try to squeeze out and press the receiving player, who passes to an overlapping full back in the wide channel. The full back should try to cross and the goalkeeper must command his area and come out to catch the ball under pressure from the additional blue attackers, as shown [2a].
2a
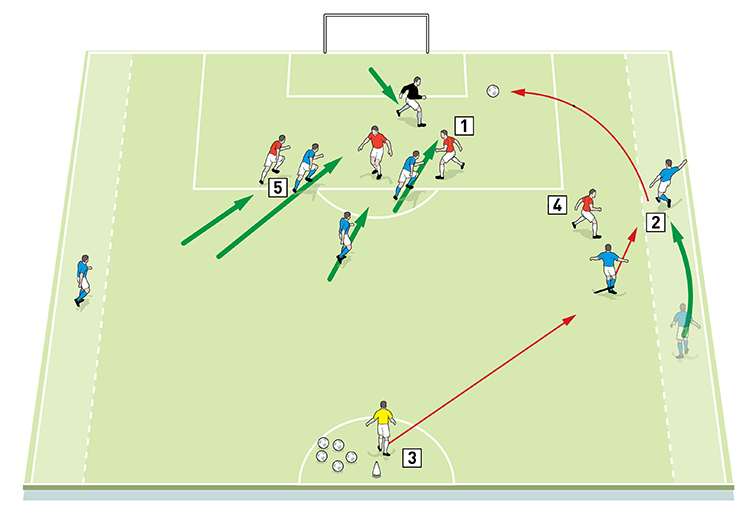
2. The blues have an attacking full back on each wing. They are two touch and must stay in the wide channels
3. The starting pass in made by the server to a wide attacker. He combines with an overlapping full back, who crosses into the penalty area
4. The nearest red full back squeezes play and tries to stop the cross
5. The blues have added forwards who attack the cross but the red defenders should check their movement and try to block attacking runs
However, if the attacking player is forced, by the pressure of the red full back, to pass back into the wide channel after receiving the starting ball, the remaining red defenders should all push out, squeezing space up the pitch and forcing the blue attackers to look to stay onside when the ball is crossed, as shown [2b].
2b
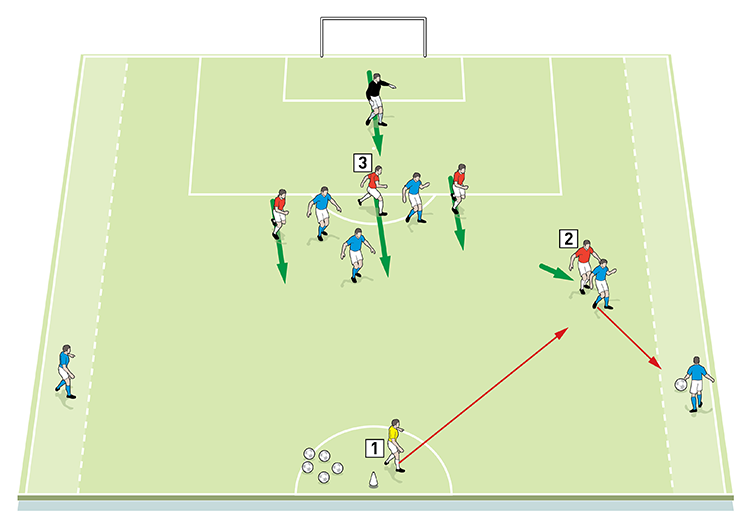
2. Here the red full back applies pressure to the blue attacker, forcing him to pass back to his supporting full back in the wide channel
3. If the blues pass back, the red defenders push out, forcing the blue attackers to have to stay onside when the ball is crossed
What are the key things to look out for?
We want to see the defenders scanning just before the cross comes in, so they are aware of the position of the strikers. This means they can move to block any runs if necessary.
The goalkeeper must use good communication with his defenders and should command his penalty area, taking the ball at its highest point by catching or punching. The defenders and the goalkeeper should show good technique in clearing the ball, using height and width.
We want to see good pressure applied by the nearest defender to the ball to try and stop the cross, and if the attackers are forced to play the ball backwards, we want to see the remaining defenders squeezing space and coming out marking.
How would you put this into a game situation?
Defending crosses game
Now the session becomes a game and small goals are added at the end opposite to the main goal. We’re using 16 outfield players: a blue attacking team of eight, a red defending team of seven, plus the yellow server who plays as a centre forward for the red defending team and as a centre back for the blue attacking team, depending on which team is in possession.
Players are in the same positions as the previous practice, but with added midfielders. The defending team lines up in a 4-3-1 formation and the attacking team lines up in a 3-3-3 formation, but the yellow server features in both formations.
The blue full backs remain locked into the wide channel and are restricted to two touches, but other players from the attacking team can enter the wide channel to receive the ball and cross if needed, as shown [3a].
3a
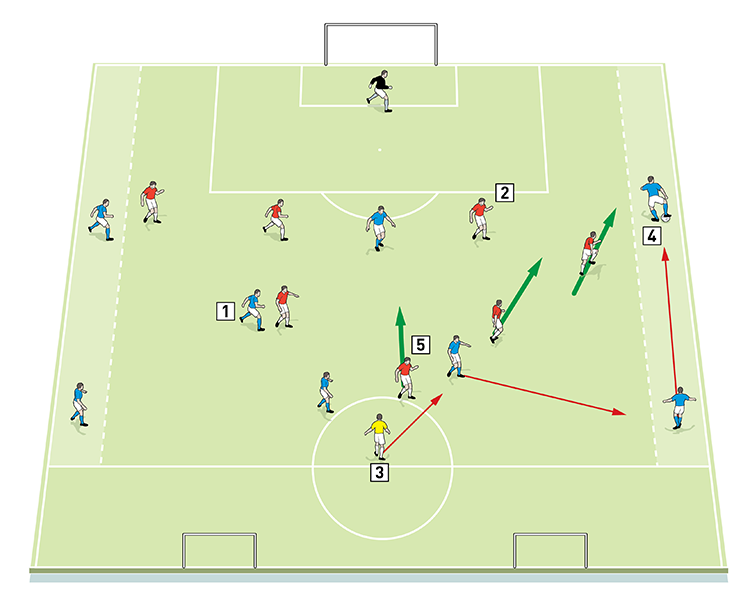
2. The red defending team use a 4-3-1 formation and counter-attack the small goals
3. Play always starts with a pass to the attacking team from the yellow server, who plays for the reds as a centre-forward and for the blues as a centre back
4. The blues can attack using their players crossing from the unopposed wide channels
5. The red midfielders should drop back to fill space when their defenders move across to block the crossing attackers in the wide zone
If the red defending team wins the ball, they counter-attack the two small goals, using the help of the yellow server as a centre forward, as shown [3b].
3b
2. The reds play the ball up to the yellow server, who acts as their centre forward when they are in possession. Here he sets up a midfielder to score in one of the small goals
Related Files

Get a free issue

Latest Issue

Subscribe Today

Editor's Picks
Intensive boxes drill with goals
Penetrating the final third
Creating and finishing
My philosophy
Pressing initiation
Compact team movement
Defensive organisation
Back three tactics
Counter-pressing as an offensive weapon
Coaches' Testimonials

Alan Pardew

Arsène Wenger

Brendan Rodgers

Carlos Carvalhal

José Mourinho

Jürgen Klopp

Pep Guardiola

Roy Hodgson

Sir Alex Ferguson

Steven Gerrard
Related


Third phase overload and finishing pattern

Sunflower positioning

Possession in wide areas
Get a free eBook
Coaches' Testimonials

Gerald Kearney, Downtown Las Vegas Soccer Club

Paul Butler, Florida, USA

Rick Shields, Springboro, USA

Tony Green, Pierrefonds Titans, Quebec, Canada
Join the world's leading coaches and managers and discover for yourself one of the best kept secrets in coaching. No other training tool on the planet is written or read by the calibre of names you’ll find in Elite Soccer.
In a recent survey 92% of subscribers said Elite Soccer makes them more confident, 89% said it makes them a more effective coach and 91% said it makes them more inspired.
Get Monthly Inspiration
All the latest techniques and approaches
Since 2010 Elite Soccer has given subscribers exclusive insight into the training ground practices of the world’s best coaches. Published in partnership with the League Managers Association we have unparalleled access to the leading lights in the English leagues, as well as a host of international managers.
Elite Soccer exclusively features sessions written by the coaches themselves. There are no observed sessions and no sessions “in the style of”, just first-hand advice delivered direct to you from the coach.