You are viewing 1 of your 1 free articles
Creating and finishing
This session is all about creating and finishing from a variety of distances and positions in and around the box. The majority of chances created will be from crosses but scoring opportunities also arise from both through balls and combination play. This session is good preparation for leading into tactical work, or to reinforce some coaching points before a game. The aim is to build solid connections and relationships between certain positions and the players that play in those positions.

| Area | Up to half a pitch |
| Equipment | Balls, bibs, cones, training hurdles, poles, hoops, 8 mannequins, target goals, 1 full size goal |
| No. of Players | Up to full squad |
| Session Time |
Warm-up: 10mins, Boxes: 15mins, Unopposed movement patterns: 25mins, Tactical patterns: 25mins |
This training session is all about creating and finishing from a variety of distances and positions in and around the box. The majority of chances created will be from crosses but scoring opportunities also arise from both through balls and combination play.
This session is good preparation for leading into tactical work, or to reinforce some coaching points before a game.
What we want to try to do is to build solid connections and relationships between certain positions and the players that play in those positions.
The aim is to give the players a clear understanding of the way we want them to move, both with and without the ball, and to help them appreciate the decisions they have to take in certain areas of the pitch, depending on the situations that arise.
Within this practice we can try to correct our tempo and the timing of certain aspects of our play, while trying to be as clinical as we can around the box.
This type of session would be key to our training each week and it is usually typical of any of the days leading into a match. We will look to repeat the same ideas and cover similar principles and concepts each week in order to improve the overall level, tempo and intensity of our play. This way it allows us the opportunity to add more detail as we return to it again in the future.
WARM-UP
We begin with the players warming up by performing physical exercises in a circuit, going through all four different stages at moderate pace, as shown [1].
1
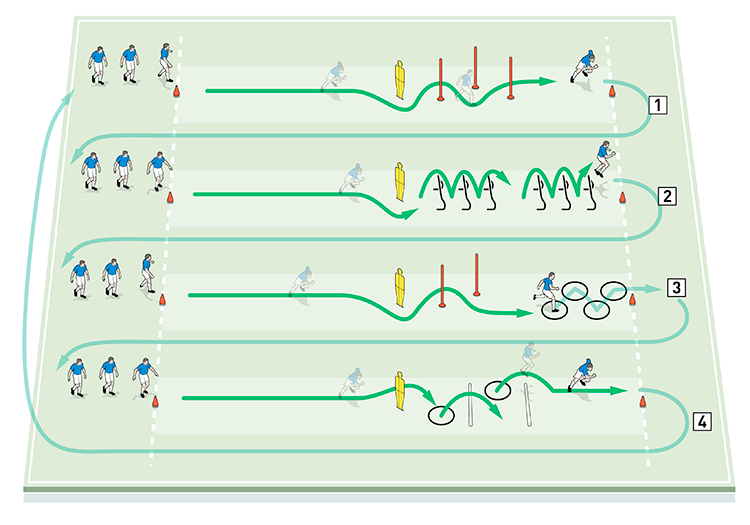
2. Stage 2: Each player runs around the mannequin before jumping through a course of six training hurdles
3. Stage 3: Each player runs around the mannequin before zigzagging through a couple of poles and stepping through four hoops at speed
4. Stage 4: Each player runs around the mannequin before jumping two footed through the hoops and over the poles
Stage 1: Each player runs to the mannequin and goes around it before zigzagging through a series of poles to the end. They then join the back of the queue at the next exercise.
Stage 2: Each player runs to the mannequin and goes around it before jumping over six training hurdles. They then join the back of the queue at the next exercise.
Stage 3: Each player runs to the mannequin and goes around it before zigzagging through a couple of poles and stepping through the four hoops at the end. They do this at speed with the right foot stepping in each hoop on the right and the left foot stepping in each hoop on the left. They then join the back of the queue at the next exercise.
Stage 4: Each player runs to the mannequin and goes around it before jumping two footed through the hoops and over the poles on the ground. They then join the back of the queue at the first exercise and go around the course again.
We would run this activity for 10 minutes.
BOXES
We progress the warm-up further with a rondo, as shown [2], either in a 5v2, a 6v2, or a 7v2. This gets players working under pressure in a small space, with two pressers trying to gain the ball from the passers and swapping places with the passer who loses possession if they succeed in winning the ball.
2
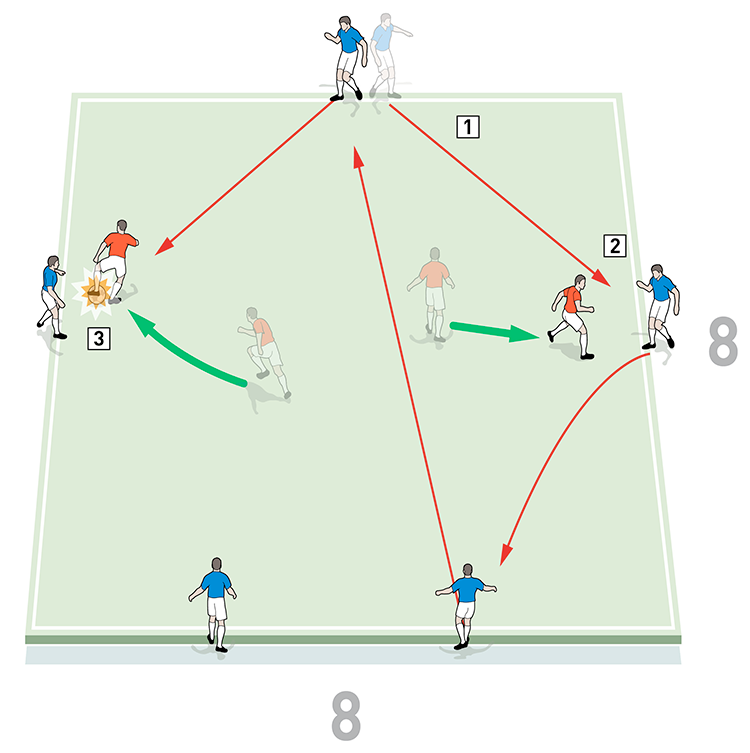
2. Two red pressers try to gain the ball from the passers
3. If a presser succeeds in winning the ball, they swap places with the passer who loses possession
We’re showing an area of 8x8 yards with a 5v2 rondo but the size of the area can change depending on the degree of difficulty required. If we want to make it easier, we make the area larger and vice versa. This rondo is a fundamental exercise that links to many aspects of our game. We would run this for 15 minutes.
UNOPPOSED MOVEMENT PATTERNS
We set up on half a pitch with a goal and a goalkeeper in their usual positions at one end. We place eight mannequins outside the penalty area to represent the opposition. We’re using a team of seven blue attackers with players in their positions, as shown, but we can double up in certain positions if needed.
The aim is for the forwards to use the mannequins as a reference point for them to practice unopposed attacking sequences, resetting after each finish on goal.
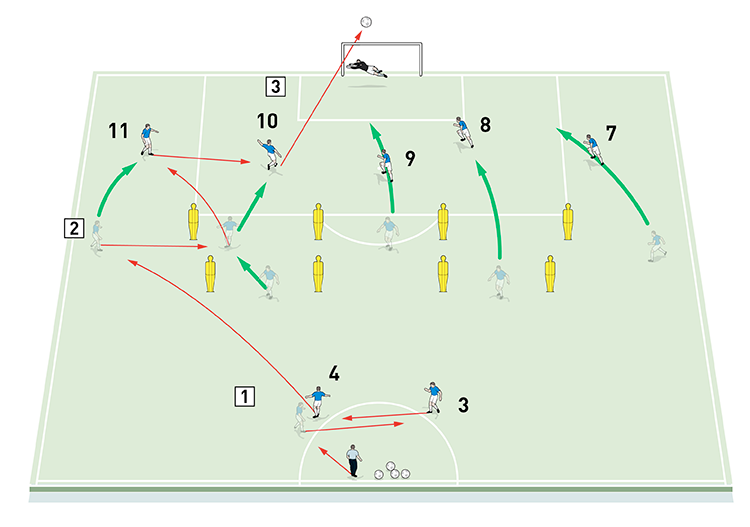
Sequence 1: We start play with a ball served from the coach to one of the central defenders. The defenders combine with each other before playing the ball directly out to one of the wingers. The attacking midfielder then makes a run in behind the mannequins to receive a pass from the winger and he crosses for an attacker to finish with a shot on goal, as shown [3a].
3a
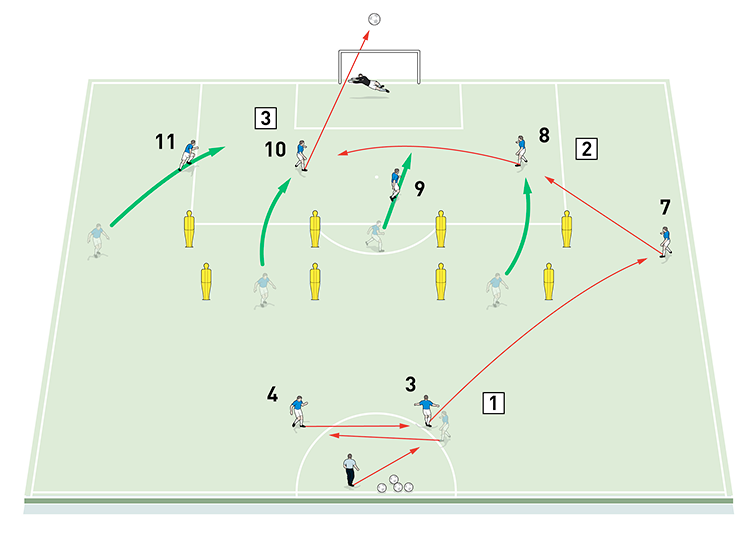
2. The attacking midfielder 8 makes a run in behind the mannequins to receive a pass from the winger 7
3. The attacking midfielder 10 and the centre forward 9 make runs to meet a cross from the winger 7 and one of them finishes with a shot on goal
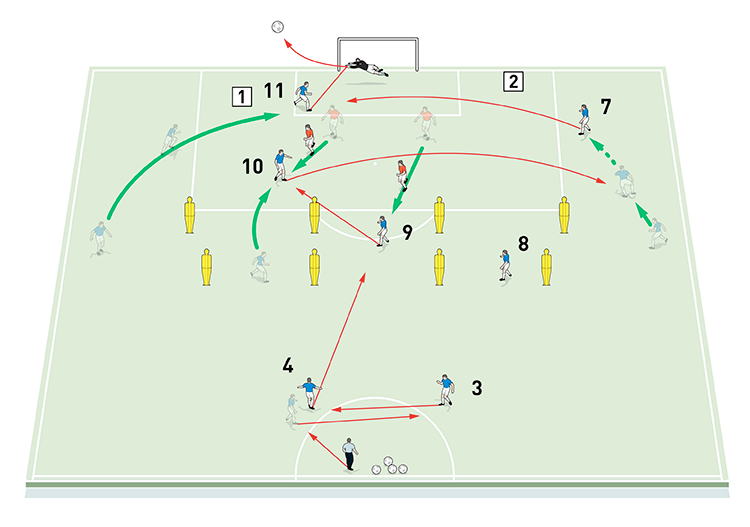
Sequence 2: After receiving a ball from the coach, the central defenders start by combining with one another before playing the ball to the number 9, who sets it back to either of the attacking midfielders. The wingers have made a run in behind the defence and the attacking midfielder slides a pass in behind for one of the wingers to cross. An attacker meets the cross and shoots at goal, as shown [3b].
3b
2. The number 9 sets the ball back to attacking midfielder 8
3. The wingers make runs in behind the mannequins and the attacking midfielder 8 slides a pass for one of the wingers to cross
4. An attacker meets the cross and shoots at goal
Sequence 3: The defenders combine with each other before passing the ball directly to a winger, who combines with the attacking midfielder to play around a full back mannequin. The attacking midfielder receives the return ball and shoots at goal, as shown [3c].
3c
2. The winger 11 combines with an attacking midfielder 10 to play the ball around a full back mannequin
3. The attacking midfielder 10 receives the return ball and shoots at goal
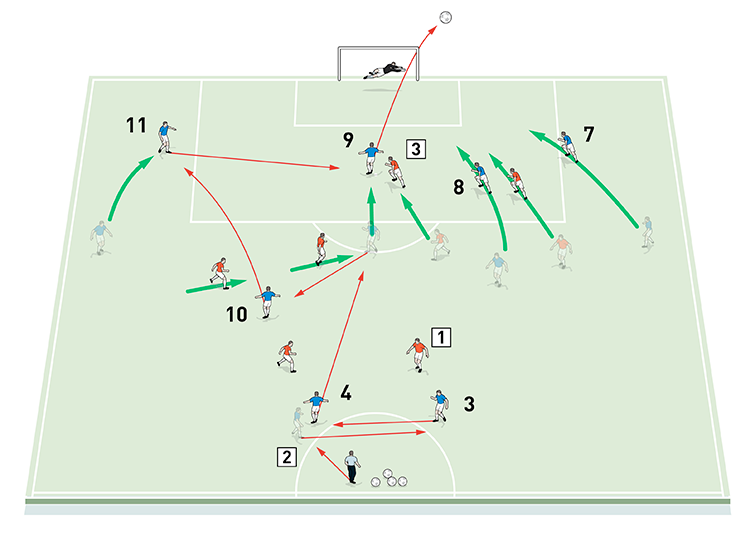
We progress this part of the session by adding live defenders, who defend the goal from inside the penalty area, as shown [3d]. We still run the sequences as described previously, but we allow the attacking players to respond creatively in the penalty area to beat the live defenders. Adding opposition defenders will increase the focus of the forwards and sharpen their movements and finishing.
3d
2. Run the sequences as before, but allow attacking players to respond creatively in the penalty area to beat the live defenders
We run this for 25 minutes.
TACTICAL PATTERNS
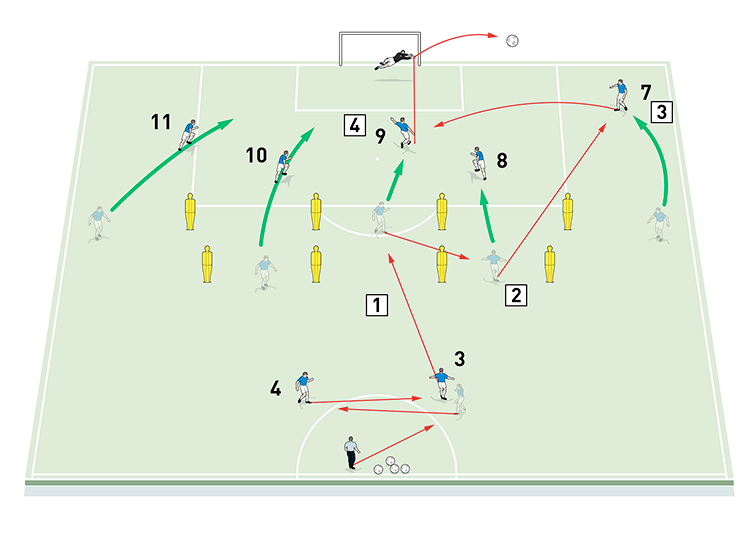
Now we replace the defensive mannequins with six live defenders. We run the same attacking sequences as before but the introduction of live defenders makes the exercise more tactical and both creates more pressure for the attackers and adds some realism to the sequences. Each time an attack has finished, start again with the coach serving the ball to the central defenders, who combine to launch an attack, as shown [4a].
4a
2. Start with the coach serving the ball to the blue central defenders, who combine to launch an attack
3. Run the same attacking sequences as before but the live defenders create more pressure for the attackers and require the attackers to respond tactically
Occasionally the coach should vary the starting ball by serving to one of the live opposition defenders. This creates a transitional opportunity for the attacking team, requiring the attackers to aggressively press the opposition to turn over possession before they can launch an attack, as shown [4b].
4b
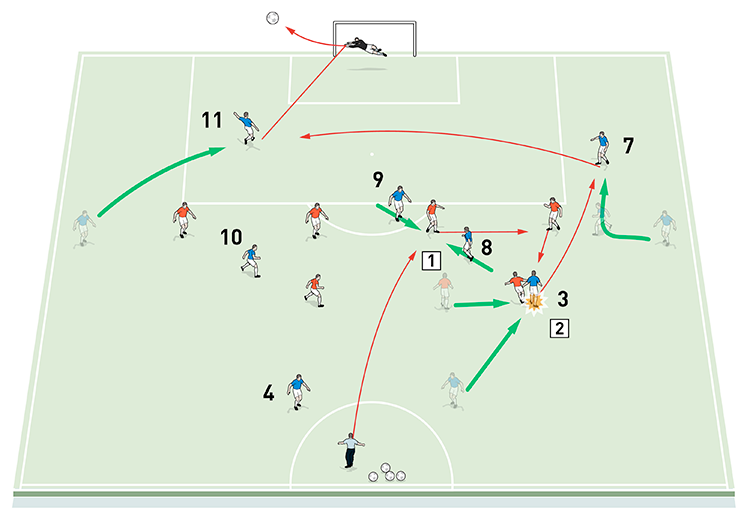
2. The attackers have to press aggressively to turn over possession before they can launch an attack
This also gives extra motivation for the defending team to continue to work well off the ball.
We can progress this activity by placing small goals on the halfway line to add a transitional target for the defending side to pass into should they win possession of the ball.
We run this activity for 25 minutes.
COACHING POINTS
What are the key things to look for?
The aim is for the players to try to use full coverage of the pitch and maintain good positional distribution. It also encourages players to pass to one another with the right tempo, using one-two touches whilst watching one another to see how and where players need to move.
In this session we want our forwards to maintain their height and width on the pitch, which will help them with good movements to receive both in front and behind. We want them to attack the space behind the mannequins quickly and look to pick out a team mate to finish the move off.
What are the typical mistakes players might make and how do I avoid them?
Typically we would see wide players coming too close to the ball to receive. We would also see misdirected passes, while the timing of runs and the weight of pass could be slightly off. These things happen and we just need to ensure that the wingers maintain their position with good body shape and we correct the other aspects as soon as we can.
How would I put this in a game situation?
The ideas in this session can lead you into a live tactical practice with opposition players. We use mannequins in the first instance to give players confidence in the ideas we want to instill in them. When we add opposition, we want to increase the tempo to get it as close to the game as possible and to create a lot more scenarios for the players to make decisions. We can do this by creating an 11v11, or chopping it down to create overloaded phases of play with an 11v10, a 10v8 or a 7v6, depending on the players we have available.
Related Files

Get a free issue

Latest Issue

Subscribe Today

Editor's Picks
Intensive boxes drill with goals
Penetrating the final third
Creating and finishing
My philosophy
Pressing initiation
Compact team movement
Defensive organisation
Back three tactics
Counter-pressing as an offensive weapon
Coaches' Testimonials

Alan Pardew

Arsène Wenger

Brendan Rodgers

Carlos Carvalhal

José Mourinho

Jürgen Klopp

Pep Guardiola

Roy Hodgson

Sir Alex Ferguson

Steven Gerrard


Get a free eBook
Coaches' Testimonials

Gerald Kearney, Downtown Las Vegas Soccer Club

Paul Butler, Florida, USA

Rick Shields, Springboro, USA

Tony Green, Pierrefonds Titans, Quebec, Canada
Join the world's leading coaches and managers and discover for yourself one of the best kept secrets in coaching. No other training tool on the planet is written or read by the calibre of names you’ll find in Elite Soccer.
In a recent survey 92% of subscribers said Elite Soccer makes them more confident, 89% said it makes them a more effective coach and 91% said it makes them more inspired.
Get Monthly Inspiration
All the latest techniques and approaches
Since 2010 Elite Soccer has given subscribers exclusive insight into the training ground practices of the world’s best coaches. Published in partnership with the League Managers Association we have unparalleled access to the leading lights in the English leagues, as well as a host of international managers.
Elite Soccer exclusively features sessions written by the coaches themselves. There are no observed sessions and no sessions “in the style of”, just first-hand advice delivered direct to you from the coach.