
OUR BEST EVER OFFER - SAVE £100/$100
JOIN THE WORLD'S LEADING PROFESSIONAL DEVELOPMENT PROGRAMME
- 12 months membership of Elite Soccer
- Print copy of Elite Player & Coach Development
- Print copy of The Training Ground
Score more goals
There is no better way to enhance the finishing technique of a player than to get him to repeat the gesture over and over, and moreover, finishing is the gesture that gives the most joy to the players. They enjoy this session because even the warm-up is focused on finishing and it progresses into a realistic shooting drill without changing the size of the playing area too much...
| Area | Half a pitch |
| Equipment | Balls, bibs, cones, 3 mannequins, 2 small goals, 2 full-size goals |
| No. of Players | Up to 18 players + 2 goalkeepers |
| Session Time |
Warm-up: 15mins, Finishing drill: 20mins, Double box game: 20mins |
To win a match you have to score at least one goal more than your opponents, so the striking ability of the players is of paramount importance. The areas of the pitch that shots are more likely to hit the target from are obviously inside the penalty area and just outside it. These activities are dedicated to shooting from those areas.
There is no better way to enhance the finishing technique of a player than to get him to repeat the gesture over and over, and moreover, finishing is the gesture that gives the most joy to the players. They enjoy this session because even the warm-up is focused on finishing and it progresses into a realistic shooting drill without changing the size of the playing area too much.
We end the practice using the small-sided game format to promote fast combinations and quick shots.
The key to the success of this session is repetition, repetition, repetition.
What do I get the players to do?
Warm-up
We set up a playing area between the penalty box and the halfway line, with two small goals at one end and two mannequins set up as shown. We’re using at least 10 outfield players, split into two working groups of five. We’re positioning the players as shown [1], but the distances between the player positions are up to the coach. Both groups run the drill simultaneously on different sides of the playing area.
1
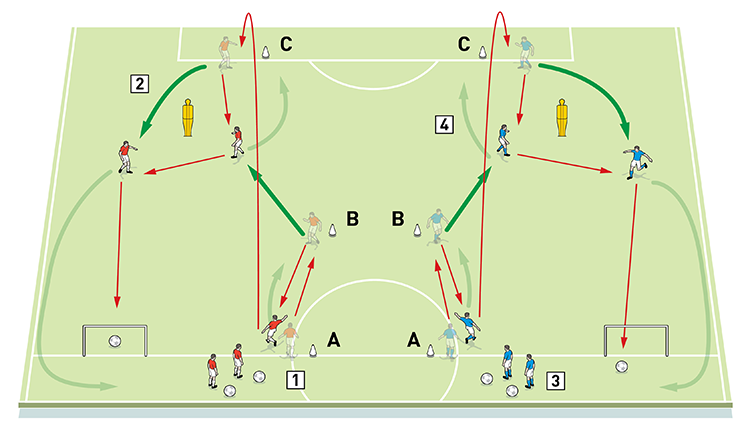
2. On receiving, the player at C plays a one-two around the mannequin with B and then shoots at the small goal
3. The drill is run simultaneously by both groups of players
4. After each rep, the players switch positions: the first player at A goes to B; here B goes to C; and C goes to position A of the other group. The next A player in line will start the drill again
The drill starts with a pass from the first player at position A to the player at position B, who returns the ball to A. The player at position A then plays a long ball to the player at position C. Upon receiving the ball, C plays to B for a one-two combination around the mannequin and then C shoots at the small goal. The players then switch positions: A goes to B, B goes to C, and C goes to position A with the other group. The next A player in line restarts the drill again.
What are the key things to look for?
We want to see the players demonstrating accurate passing and crisply executed combinations. The timing of runs is also important, as is the accuracy of finishing.
Although we show only one kind of execution here, this type of drill offers several possible technical progressions that are down to the coach.
What do I get the players to do next?
Finishing drill
This finishing drill is aimed at allowing attacking players to perform a repetition of shots on goal from different angles after quick and short combinations outside the box. This is in order to develop their execution technique.
We set up on the final third of the pitch, with a goal and a goalkeeper at one end in their normal positions. Three mannequins are set up to represent defenders, as shown. We’re using 11 outfield players here, split into nine red attackers and two blue crossers, but numbers can vary and we often use up to 20 players to involve the full squad. We split the attackers into three groups that line up outside the penalty area at positions A, B and C. Crossers wait by each corner flag at positions D and E.
After being fed a starting pass from the team mate waiting behind him, the first player at position A (player A1) dribbles forward. He avoids the mannequin and bends a right-footed shot at the goal. Then, after receiving a second ball from player B2, he passes past the central mannequin into the path of player B1, who shoots at goal with his right foot, as shown [2a].
2a

2. After shooting, player A1 drops to receive a ball from player B2 and passes into the path of B1
3. Player B1 receives the ball in his stride and shoots at goal with his right foot
After this shot, player A1 continues his run and completes a one-two combination with the first player from position C (player C1). Player C1 receives the return ball and makes a diagonal shot at goal with his right foot, as shown [2b].
2b
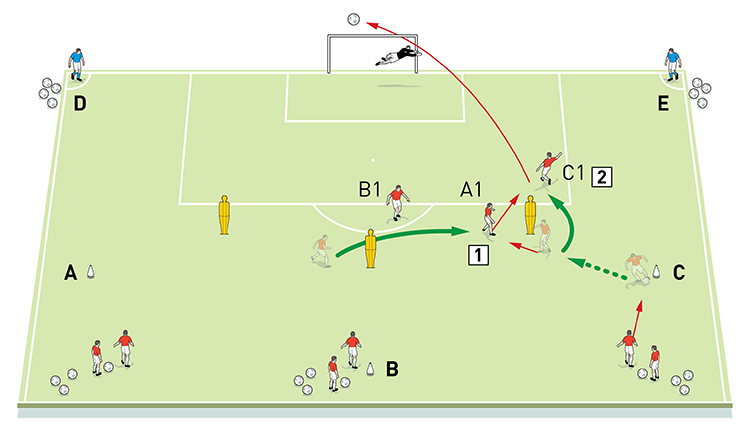
2. A1 returns the ball around the mannequin to player C1, who receives on the move and takes a diagonal shot at goal with his right foot
After this shot, players A1, B1 and C1 make runs into the box to meet a cross from the left from position D, as shown [2c], and then immediately afterwards they receive a cross from the right from position E, as shown [2d]. Then the players switch positions: player A1 goes to the back of the queue at B, player B1 goes to the back of the queue at C, and player C1 goes to the back of the queue at A. Usually we do not rotate the crossers because we want them to perfect their crossing technique.
2c
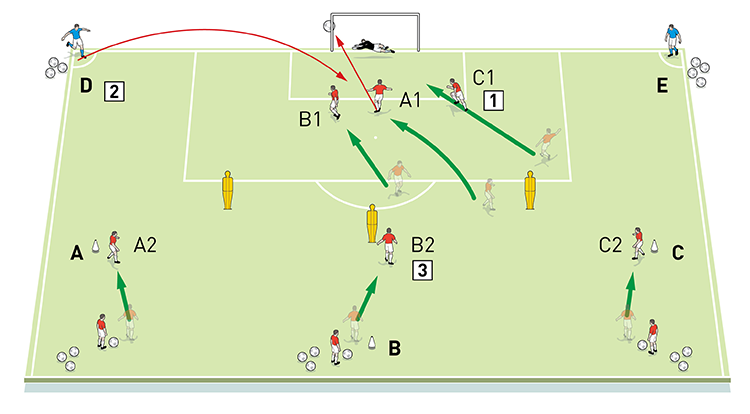
2. The player at position D crosses from the left and the three attackers try to meet the ball for a fourth shot on goal
3. The second attacker at each starting position moves forward and they wait for their turn to go
2d
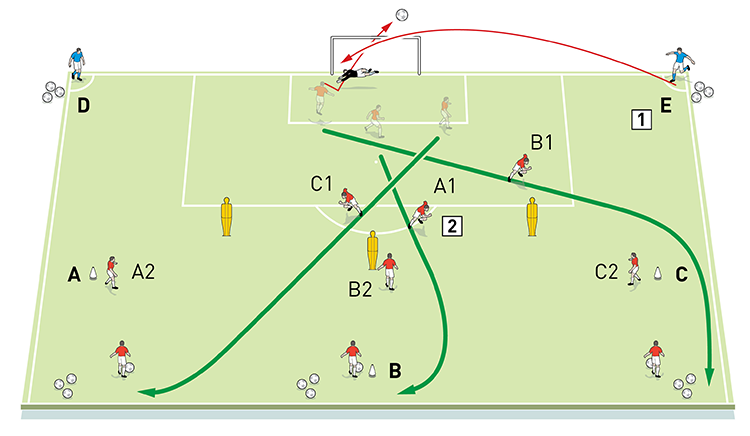
2. After the ball goes dead, player A1 goes to the back of queue B; player B1 goes to the back of queue C, and player C1 goes to the back of queue A
There are five different shots in this exercise and every player should experience each of the shots. It is a little taxing for the keepers but they usually enjoy the drill. The shots shown in the diagrams are just an example of what is possible and it will be up the coach’s ability and creativity to introduce new ones.
We would run this drill for a total of 20 minutes – usually 10 minutes attacking from the left and 10 minutes attacking from the right.
What are the key things to look for?
We want to see accuracy of passing, receiving, combining and shooting. It’s also quite important to see the players demonstrating self-correction and self-motivation to improve their performance at each shot.
How would you put this into a game situation?
Double box game
We set up in an area the size of two penalty boxes with a goal at each end. We’re using 18 outfield players and two goalkeepers. Two teams of five plus keepers play a directional game against each other in the main area, with the help of two neutrals who play for the team in possession. A third team of six players are positioned around the outside of the area – they are the bumpers and their role is to play bounce passes with the possession team, as shown [3].
3
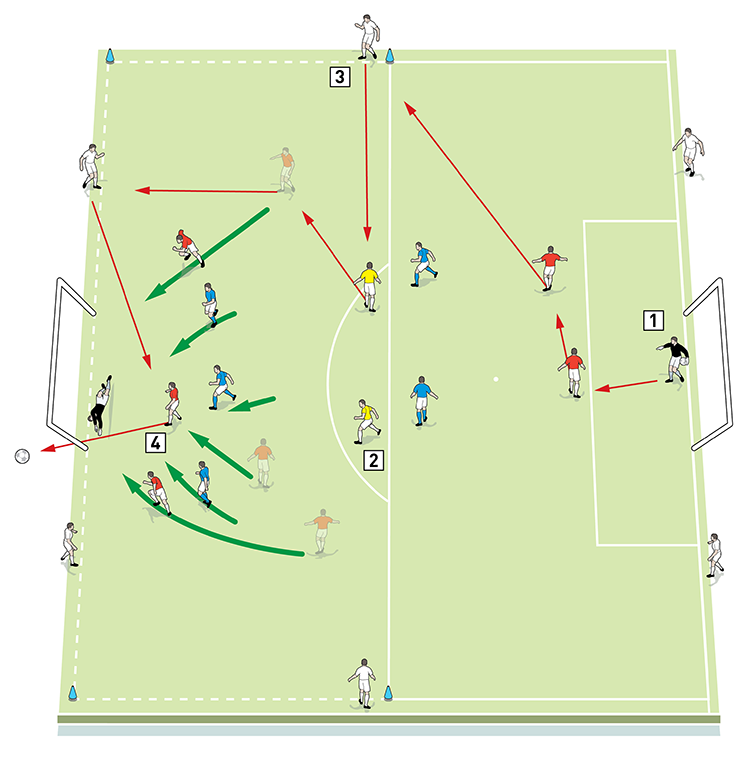
2. The two yellow neutrals play for the team in possession and they are limited to two touches
3. The six outside ‘bumpers’ can play one-touch bounce passes in support of the possession team
4. The possession team has just 10 seconds to get a shot off. Then play restarts from the opposition keeper
The goalkeeper starts play and the main aim for the team in possession is to create goal scoring opportunities. Plenty of chances should be made because the possession team has a numerical advantage due to the support of the two neutral players and the bumpers on the outside.
To keep the tempo high, we impose a time limit and give the possession team just 10 seconds to shoot, starting from the keeper’s first pass.
There is no limit to touches for the 5v5 players, but the outside bumpers have only one touch and the two neutrals are limited to two touches. Play always restarts from a goalkeeper.
After each game, the outside team switches with one of the 5v5 teams. We also switch one neutral player as well. We play two-minute games with each game followed by two minutes of rest. We play for a total of 20 minutes, with each team playing eachother twice.
What are the key things to look for?
For the activity to succeed, players should look to shoot as soon as possible. We want to see teams playing quickly and making direct attacks on goal. We make sure the players understand that every pass should take a team closer to the goal.
We want to see the possession team using their numerical superiority to their advantage and they should create 2v1 situations when attacking.
Related Files
More like this
Editor's Picks
Attacking transitions
Deep runs in the final third
Using the goalkeeper in build-up play
Intensive boxes drill with goals
Penetrating the final third
Creating and finishing
My philosophy
Pressing initiation
Compact team movement
Coaches' Testimonials
Alan Pardew
Arsène Wenger

Brendan Rodgers
Carlos Carvalhal
José Mourinho
Jürgen Klopp
Pep Guardiola
Roy Hodgson
Sir Alex Ferguson
Steven Gerrard
Coaches' Testimonials
Gerald Kearney, Downtown Las Vegas Soccer Club

Paul Butler, Florida, USA

Rick Shields, Springboro, USA

Tony Green, Pierrefonds Titans, Quebec, Canada
Join the world's leading coaches and managers and discover for yourself one of the best kept secrets in coaching. No other training tool on the planet is written or read by the calibre of names you’ll find in Elite Soccer.
In a recent survey 92% of subscribers said Elite Soccer makes them more confident, 89% said it makes them a more effective coach and 91% said it makes them more inspired.
Get Monthly Inspiration
All the latest techniques and approaches
Since 2010 Elite Soccer has given subscribers exclusive insight into the training ground practices of the world’s best coaches. Published in partnership with the League Managers Association we have unparalleled access to the leading lights in the English leagues, as well as a host of international managers.
Elite Soccer exclusively features sessions written by the coaches themselves. There are no observed sessions and no sessions “in the style of”, just first-hand advice delivered direct to you from the coach.
